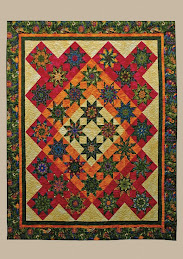
I started with the bottom row and eased myself into the process by doing the leaf square since this was straight edge piecing and so would go fast. With straight edge piecing, you leave the templates in, match up the tick marks and sew along the edge of the templates - in my case I had used a rotary cutter to add a 1/4" seam allowance so I simply used my 1/4" foot. The templates help keep the piece from distorting where there are many bias edges. I took the templates ut only when I wanted to use them for another leaf.
Next I worked on one of the easier flowers. I had cut out the pieces with an approximate 1/4" seam allowance. First, I needed to draw around the template using a pencil or soft colored pencil that would show against the fabric, and also extend the tick marks out into the seam allowance. Then, I clipped the concave edges to allow the fabric to open up when pinned to a convex piece.

It is necessary to remove the templates before sewing - the reason for drawing in the seam line and why the tick marks have to be extended into the seam allowance. The pieces are pinned using the tick marks to line them up with the concave piece on top.
Fine silk pins work best since you can sew right over them if you don't care to pull them out as you sew. For tight curves, a lot of pins are needed.

No comments:
Post a Comment